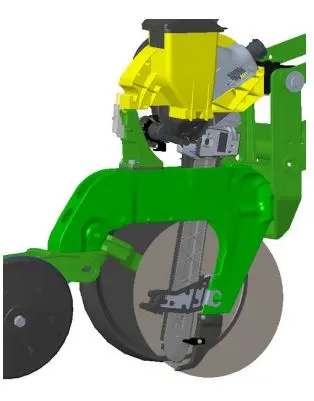
John Deere Row Unit Inspection
We are trying to create a trench, deposit a seed, then close the trench back to a
state as if we were never there. The trench should be impossible to find if closed correctly in
good conditions. Here are some main areas of wear to check.
 1. W Bracket
2. Parallel Arms
3. Shank & Goal Post
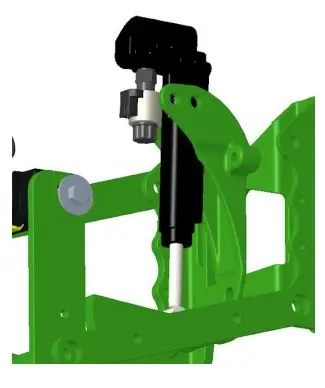
4. Downforce System
5. Meters
6. Seed Tubes
7. Disc Openers
8. Seed Firmers
9. Gauge Wheels
10. Depth System
11. Drive System
12. No Till Coulter
13. Row Cleaners
14. Closing System
15. Drag Chains
Note: Recommended Settings and Tips will be in italics
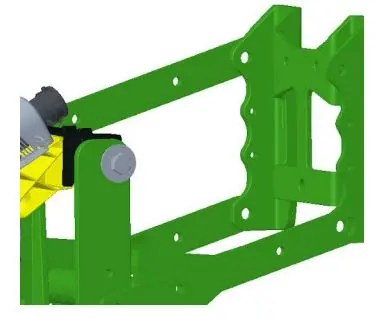
Visual inspection of W plate and attachment bolts, wear/cracks/wallows
Plate styles and wear points – Welded vs Cast
W plate is truly vertical to allow uninterrupted movement
U-bolts are tight and intact

Not Bent
Bushing Hole
Wore -Arm replacement if loose
Wore -Arm drilled for oversize bushing
Various replacement kits Bolt and Bushing Inspection
Threaded bolt – replace yearly
Solid Shoulder bolt – More surface area for contact
Oversize – Drill out & replace with oversize bolt/bushing
Row unit should have slight vertical movement (no more than ½”), if pronounced sideways movement is present – arms or bushings need to be replaced.
Understand different styles of attachment - tapered bushing, pressed bushings, shouldered bushing or OEM replacement. Note: Best practices is the use of a cherry picker to lift row unit
Excessive wear stress cracks on shank and goal post. Shank damage is normally due to a rock strike. Goal post damage can occur from rock strike and excessive side shear. Can be accentuated by parallel arm bushing wear or adverse conditions
Seed Tube Guard inspection makes sense at this point
Recommendations for examining the shank, what level of deconstruction is needed to do this properly
Inspection, Speed/Seed tube Guard
Compare wear by holding a new point/frog with existing one
We only allow ⅛’ wear before replacement
If any marks on Seed tube, guard should be replaced
Spring Style
Broken or uneven tension
Wear of bracket where rubbing Parallel Arm
Air Bag System Inspection
Inspect for leakage
Inspect for cracking on sidewall
If lift bags – check these as well
Inspect load pin wiring & routing
Run health check if possible
Change air filter annually (Nylon Cover)
Belt/idler pulley inspection
Hydraulic Downforce
Ram/rod inspection
Leaking
Scoring
Filter Nut retention kit installed
Fitting- Check for leaks
Inspect load pin wiring & routing
Run health check if possible
Change filter (Every 5 years)
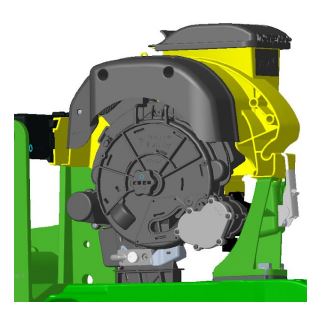
Check hoppers for cracking at mounting points
Check latches - set properly & correct tension
Visual Meter inspection/Disassembly
Metermax - Utilize Your Meter training for all inspection - too many differences to list here
Run at least 1-2 meters - if possible, all meters to be tested on stand with grower’s seed
Seed Tube Style
Every tube needs to be pulled out for proper inspection. Verify hook is in correct position
Inspect/ feel bottom of the tube, check for hangnails or curled plastic.
Check for side wear when blades are removed.
If visual wear on side of tubes, immediately check the seed tube protector.
If older style that has hole through tube for seed eye – Replace with Bullseye to reduce ricochet Note: Replace seed tubes and protector in tandem
Speed Tube System
Recommendation is that the ST belt is removed during off-season
Check feeder wheels for wear & replace if necessary (annual replacement is normal)
Check housing, seed lens sensor, belt pulleys and belt for wear
Check wear liner for grooving - make sure it has metal liner and replace as necessary.
Inspect guard for wear - replace if worn Note: See Speed Tube Maintenance Manual for further details
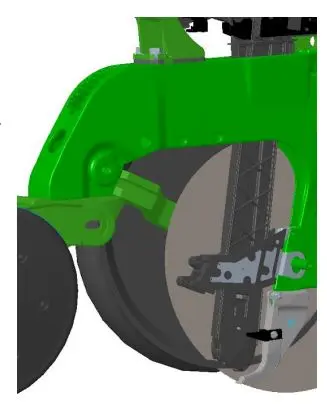
Disk Openers
The right balance between holding the trench open long enough for the seed to reach the bottom of the trench vs being too tight and causing excessive wear and strain on bearings. Common rule of thumb - if disk is worn ½” in diameter replace disc
Not all disc and hubs are created equal. Important to check for trueness or runout on any new blades
Disk opener should be 15” – only 1⁄2” of wear before replacement
Expect 3mm or 3.5mm on most units
3mm 2” - 2 1/2” contact
3.5mm 1-1/4” - 1-3/4” contact
4mm ¾” - 1” contact
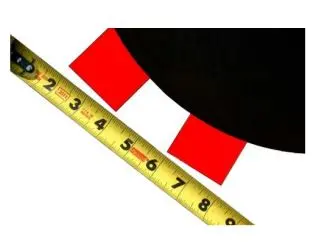
How to determine proper disk contact
Business card check or 2-3 thickness of paper - slide in from front & back marking a chalk line at both and measure the distance between the 2 marks. Keep in mind that when blade compresses against seed tube protector - additional shim removal may not change touch. This can result in excess bearing damage or dragging of blade.
Opening disk needs to be checked 180 degrees of rotation to show how concentric blade is. (No more that ¼-⅜” variance.)
Inside disc scrapers
Rotary - If ½ of material vs new is wore - needs replaced
Straight blade - If ½ of material vs new is wore - needs replaced
Springs - Verify no binding & tension is adequate
If Serrated Blades (4mm) claims: No need for coulter, eliminate side wall smear, eliminate hair-pinning. Allowance for ½ of tooth wear
Do the tails appear to be true or do they have a bend? If bent, they need to be replaced.
Are the tails flat on the bottom or are they formed into a “v”? If no longer flat they should be replaced.
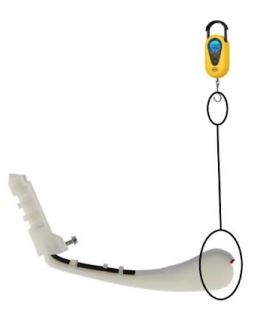
Older Style Firmers - Conduct a rigidity test, Planter should be in the lowered position with the firmers setting flat on the surface or ground. Attach a string or twine to the firmer and lift it off the ground measuring with a fish scale. A good firmer should have between 16--32 ounces of resistance. Some look/listen for good snap when contacting floor. If the firmer has a tension screw add tension or replace if out of specs.
Quick Attach firmers are non-adjustable regarding tension. Use flatness or droop (lack of tension) for replacement test.
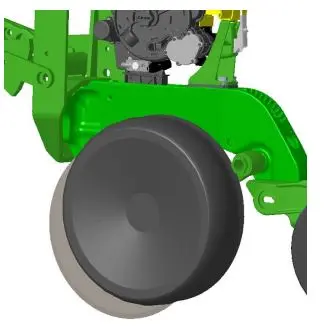
Lift each gauge wheel up to contact the stop, turn the GW and check for contact with the disk.
If hard to turn and turning blades, shim out. If wheel does not gently scrub disk, shim in. Is there enough rubber lip left to scrub disc when shimmed in. If metal on metal - gauge wheel needs replacement.
Visual inspection of socket on the arm – Wear issue if moving in & out and not tight. Bushing and/or arm need replacement
If newer style that has threaded bushing on arm - rotate threads and verify not a flat spot on threads. (Replace every 2 years to eliminate thread wear.)
Check depth consistency by lowering row unit onto 4x4 blocks
Lower each row unit down onto blocks while each row unit is set to the same depth.
Measure from bottom of disc to floor
Compare dimensions from row to row - are we within ¼-½ “?
Will need to compensate on depth settings to accommodate variance - mark row unit to reflect correct depth
Walking gauge wheel style
Inspect rocker arm for wear - Is the hole round or elongated
Is shoulder bolt showing wear? Inspect gauge wheel arm
Is pivot socket wore - needing replaced?
If bushing style - replace bushing
Arm wear where riding on rocker arm - can they be reversed for extended wear.

Chain drive systems
Inspect for rusty or locked chains
Stretched chains, have a length of new chain to compare
Verify side to side movement of chain for chain roller wear - best done on a flat surface. Compare new to old chain
Ideally - annual replacement
Sprocket wear - teeth cupping
Idler sprocket wear - inside & outside groove wear
Shaft Drive
Inspect and lubricate cable shaft
Rotate gearbox for roughness
If possible, run live seed for SRI variance
Electric Drive
Inspect teeth engagement to disc
Run health check for amperage draw
Visual inspection of electric connections
Place planter on floor and verify that coulters are minimum of ½” above the disc opener bottom. (Creates a false bottom if wrong) Spin to verify lowest point
Shim washers can be installed between front side of row unit frame and no-till bracket on bottom bolts to tip coulter up for clearance if there is not enough vertical adjustment.
Must be sharp, dull coulters will hairpin trash.
Note: Understand risk of furrowing of dirt on high speed planters
Note: Understand how coulters play into the planter down force conversation
Is the vertical movement free? Replace any bent row cleaners brkts or arms.
Inspect for bushing wallow - should be no horizontal movement
Visual inspection of spike, finger, blade. Excessive wear? Understand style of teeth - is it correct? No till vs Conventional conversation.
Spike= less chance of moving dirt.
Blade style (Shark tooth) = better at cutting of residue.
Visual inspection of “treader” wheel
wear allowance = ½ the tread. Wear affects traction & depth
If not installed – discuss need for maximum performance
Floating style - if observing fixed style discuss accuracy and % time too shallow or too deep and why we only recommend floating style. Note: Cover crops and understanding/discussion on how that af ects this choice.

Rubber Wheel
If planting 1”-2-½” deep - 2 ½”spacing, center of wheel to center of wheel
Discuss with grower too wide vs too narrow - all in relation to planting depth.
Inspect wheel bearings
Centered over row - verify it trails true (Over the center of trench)
Recommendation of staggered closing wheel if possible
Spiked Wheel styles
Recommendation of staggered wheel forward - essential if using starter in a 2x2 system and spiked wheels.
Check bushing and bearing in wheels.
Verify distance between wheels depending on the style of spike and if needed - it needs to be widened out.
Wheel spacing of 2” center of wheel at bottom of wheel Staggered vs Non-staggered closing wheels; promotes proper trench creation, and insurance for rock and debris flow as well as proper pinching of the trench. Verify tail assembly wear - bushing adjustment options, weld-on, concentric, OEM replacement, etc.
How much side to side movement - no more than ¼-½”?
Examine for loose bushings.
*Note: Majority of growers have at least aftermarket wheel. Issue arises when manufacturer's instructions on mounting positions are ignored or not referenced.
Height set correctly, 3 to 5 links contacting soil only. To many we will be to aggressive and over sift (paving a road), and drag residue (beaver hutting)
Is the vertical movement free?
Use twisted chain so the chain does not get caught on the closing system.
Single Disc 2x2 System
Inspect Wheel & bearing for wear & drag
Inspect coulter & bearing for wear & drag
Inspect knife/boot for wear – is it affecting depth placement
Inspect row filter/check valve for cleanliness
Furrow Jet System
Inspect the firmer for flatness & tension – if less than 12 oz of force, replace.
Visually inspect depth setting to make sure not set too deep. Always use wing height adjustment tool in field to verify.
Inspect FJ wings for wear – The wing height tool has a replacement mark to verify. Failing to do so may cause nozzle damage and incorrect flow issues.
Verify wing retention pin installed if in areas with rocks
Verify nozzles are not plugged
Inspect row filter/check valve for cleanliness